Yes, here I am again, after 3 months of absence. Thank you very much to all of you who have written to me asking if I was okay since I was not updating the blog. Yes, I have been fine (well regular, with a cough that has lasted for 3 months), traveling a lot, teaching courses and coming home exhausted without wanting to do anything or certainly not wanting to start baking. It seems that my body has already gotten used to this routine, the cough has almost healed and the exhaustion is beginning to pass (with the help of vitamins). Anyone who says that traveling is not hard, is that he has never done it and I do not mean a simple vacation trip, I mean traveling for work. But hey, I am not complaining because it is what I have chosen and thank God I can do it.
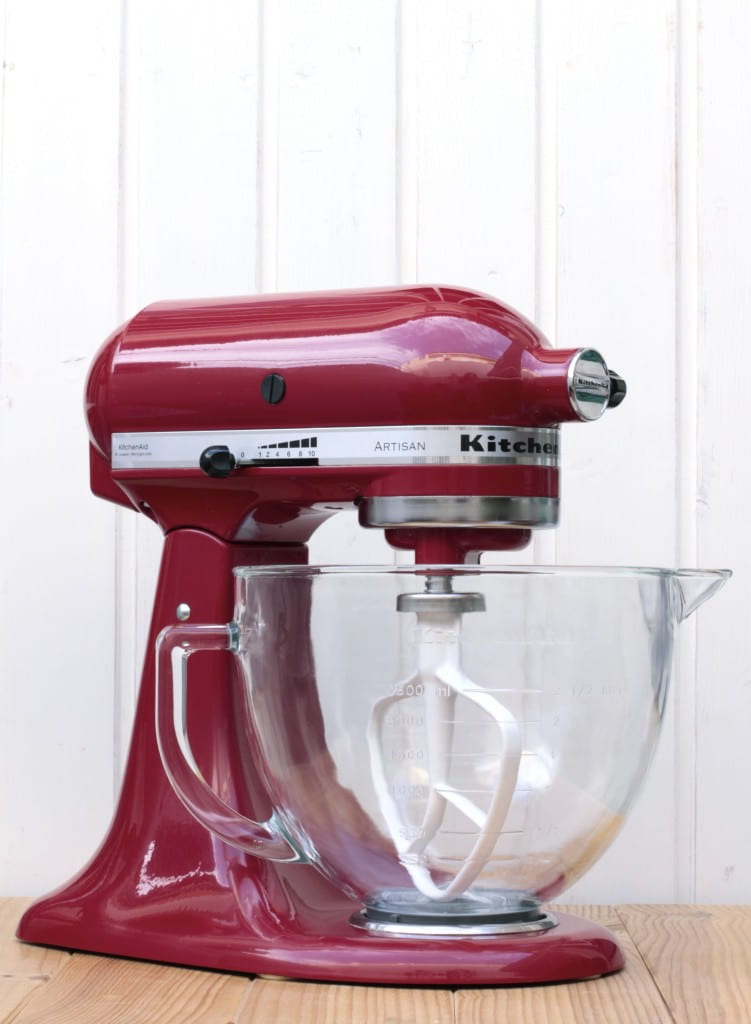
Today I’m going to talk to you again about the KitchenAid stand mixer. But first of all I want to clarify that with this I am not telling anyone to buy this blender. Not even the best. That each one buy what they want, what they like the most or what their finances allow. I just talk about the KitchenAid with this devotion, because I have it, I love it and it works wonders for me. Possibly if I had a Kenwood, a Bosch, an Electrolux, a Smeg or a Rowenta I would talk about them, but since I don’t have them, nor do I know them, I talk about my KitchenAid and also, I clarify in advance that the brand does not pay me !!! ! Info Kitchen Aid that I have written over the years, they are still the most visited blog and not only that, you keep writing to me with various doubts or to ask which one should you buy? and how to use it? But I hope that this post and the next are the final ones. and clarify all the ideas.
In answer to the first question, I will be brief. If you are going to use it for home use, then go for the Classic or the Artisan (4.8 liters or 6.9 liters). If you are going to give it a lot of use or have a business, without a doubt a professional. As its name indicates, those for domestic use are for use at home and their professional use is not recommended. Then everyone is free to do what they want with this information.
In answer to the second, I know it can be a bummer to read the instructions for an appliance, and I am the first to sing the “mea culpa” because I never did. When I bought my first SLR camera and saw the “billet” of instructions, I quickly filed it away in the instructions and warranties drawer. When one year I did my first photography course, I had to read the instructions and guess what? Everything I was learning in the course was perfectly explained in the instructions, yes, drier and with less frills, but it was there. Not that it was of much use to me, but the information was there.
In the case of your KitchenAid stand mixer, the instructions are just that, instructions that help us to better use the machine. And do not think that it only includes information about voltage, electrical precautions and their care, it also teaches you how to better handle your dough mixer and, as incredible as it may seem, it does it in only 10 sheets.
Anyway, in case you are a beginner, below you have all the information you will need, filtered, explained, with flourishes and practical examples.
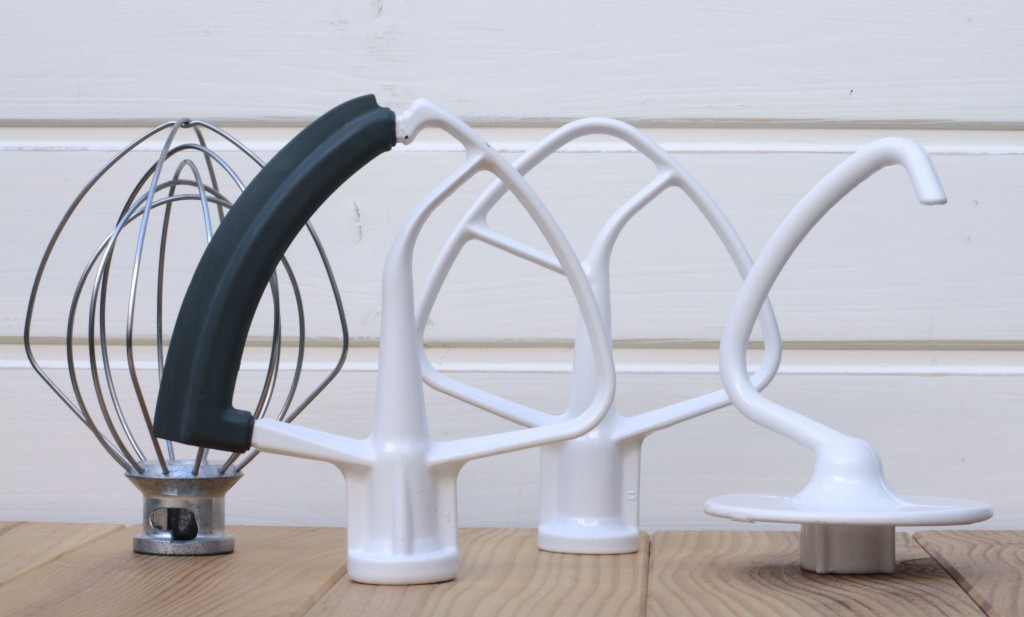
The KitchenAid stand mixer includes three accessories, the normal whisk or paddle, the whisk and the dough hook, as well as a strainer-lid.
WHAT IS EACH ACCESSORY FOR?
The normal mixer or paddle is the most versatile accessory of the mixer, suitable for beating-mixing all kinds of mixtures from normal to consistent. Ideal for preparing cakes, scones and excellent for working with butter, margarine and other creams. It is also used to make purees, sauces, patés and mixes homogeneously the ingredients for meat pies, meatballs, and perfectly prepares a buttercream or buttercream. It can be used for both a smooth ride and a smooth incorporation of ingredients. It is important to start beating at a low speed and work your way up to the right speed. There is for sale a shovel that has a silicone edge (the second starting from the left in the photo) and that helps a lot when it comes to beating the butter as it cleans the walls of the glass.
The whisk is the ideal accessory for incorporating air into preparations. It is used to whip cream, egg whites, ice cream, mousses, meringues or mayonnaise. It is also a great help to break up the lumps in sauces and creams. It is also used for sponge cakes without butter, as well as for frothy egg white glazes such as Italian, Swiss meringue, etc. You should start beating from the minimum speed and go up. It is important not to beat too fast, otherwise less air will enter and the mixture will be heavy. Remember that this whisk is NOT used to beat butter as it will stick and you will end up with a heavy batter, difficult to handle and clean.
The dough hook is used to prepare and work doughs for breads, brioches, focaccias, rolls, pizzas and pasta doughs. We can also use it when we add candied fruits or nuts to the dough of a sponge cake. The hook is ALWAYS AND ONLY used at speed 2. Using a higher speed with a yeast dough will increase the chances that the machine will fail. Before starting to knead the dry ingredients are mixed with the normal whisk or paddle to achieve a uniform distribution, after which it is changed to the hook when incorporating the liquid ingredients proceeding to knead them slowly. The dough hook effectively kneads most yeast doughs in just 4 minutes.
This is a clear example that the same accessory is not used in all preparations during the entire process. Other cases are, for example, when we make a buttercream based on Swiss or Italian meringue, we will assemble the meringue with the rods, however when we start to add the butter we must change the rods for the normal whisk or shovel. Another example is when a preparation brings whites to the point of snow. In this case we will mount the egg whites first and reserve them. Next, we will beat the butter, sugar and the other ingredients with the shovel. Finally we will incorporate the whites, something that I personally like to do by hand with a silicone spatula.
Strainer-lid: This accessory has a double function, on the one hand it directs the ingredients towards the walls of the bowl and on the other it reduces splashes by not letting them come into contact with the accessories. I honestly don’t use it.
WHAT SPEED DOES I BEAT?
Now that you are clear about how and when the accessories are used, you will become obsessed weighing that you want to have a recipe book that tells you like an automaton at what exact speed and for how long you should beat the ingredients, but this is something that you will go watching over time. It’s like when you started driving, sure you always had doubts about the gears you should use. Now I shift to second? I put third? Shall I reduce to fourth? An English friend told me, calm down, listen to the engine, it talks to you and tells you. At first I did not understand it, but there comes a time when you become one with the car, you listen and understand its sounds and you know what it needs at all times. Using your KitchenAid stand mixer will be pretty much the same. Until you have used it a few times, you won’t know if you need speed three or two. I promise you that after reading the following clarifications and after using your KitchenAid the first few times you will know what speed and approximately what time you need for each preparation. Let’s go there…
Your KitchenAid Stand Mixer has 10 speeds. All of them have a “Soft Start” function, that is to say that regardless of the selected speed, it starts working at a reduced speed, to prevent the ingredients from splashing or flying off. The speed will automatically increase until the selected speed is reached. (Well, I make a point here, since in these months during the courses I have come across some quite aggressive KitchenAid and this soft start thing … I laugh !!!)
Your KitchenAid Stand Mixer will beat faster and better than most electric mixers, so most recipes will need to adjust the mixing time to avoid over-mixing or mixing. You will be the one who determines, by observing the preparation, the desired appearance and described in the recipe. For example, stop beating when the mixture is white or smooth and creamy. Or maybe, beat until soft peaks form. Here not only observation comes into play, but common sense.
HOW ARE THE SPEEDS USED?
Speed 1 REVOLVER: To mix slowly, combine, puree and start any blending process. To add flour and dry ingredients to the dough, as well as to add liquids to the dry ones. Do not use this speed to knead bread or other yeast dough
Speed 2 SLOW SPEED MIXING: For slow speed mixing, pureeing, thick mixes and higher speed stirring. To knead yeast dough.
Speed 4 MIXING – BEAT: To beat semi-dense doughs such as cookies. To combine sugar and butter. To incorporate the sugar into the egg whites for the preparation of meringues. Medium speed for biscuits or cakes.
Speed 6 BEAT – CREAM: To beat at medium high speed or to whip.
Speed 8 – 10 BEAT / MOUNT AT HIGH SPEED: To whip creams, egg whites and meringues. To whip small amounts of cream, egg whites etc.
Intermediate speeds 3,5,7 and 9 can also be used.
When you finish using your stand mixer, it is preferable not to leave the accessories placed on the shaft, you can store them perfectly inside the glass.
SETTING YOUR KITCHENAID STAND MIXER
The first thing you have to do before using your KitchenAid stand mixer is to check that it is properly adjusted, that is, that the distance between the flat beater and the base of the mixing bowl is correct.
If the flat beater or the rods are too high, the bottom of the dough will not mix well. Otherwise, if they are too sticky, they will scrape the bottom of the glass and hit it, wearing down the coating on both the beaters and the glass.
Although this distance is factory regulated, correcting or checking this distance is absolutely necessary and very easy to do. With the mixer turned off and unplugged, raise the head or lower the glass to its lower position, (depending on which model is your model) there you will find a screw. Turn it slightly counter-clockwise (left) to raise the whisk or clockwise (right) to lower it.
The exact distance can be measured by putting your robot in gear at speed 1 with the flat beater. Insert 1 coin of 5 cm or a chickpea and start the machine. The flat beater should touch the coin lightly on each turn. If this is not the case, we will adjust the screw with a screwdriver, giving a quarter turn.
WHAT ACCESSORY DO I BUY?
The KitchenAid stand mixer has many accessories: grater, rotary cutter with optional blades, mincer, stuffer, food processor, juicer, pasta roller, ravioli accessory, cereal grinder, can opener, refrigerator, etc … these accessories at high speeds. I cannot recommend which one to buy or not since it depends on the use you are going to give it. If you make pasta, you will undoubtedly succeed with the accessories to make it. If you make sausages, the mincer and stuffer will be the best. If you like ice cream, the refrigerator will be a good purchase.
I have several of the above and personally I use the meat mincer a lot. The refrigerator, I also have it and I am very happy with it although I do not use it as much as it should.
One accessory, which is never usually part of the KitchenAid buyers’ plans that I highly recommend, is to buy a second glass especially if you are going to use the KitchenAid seriously.
Sometimes I am making several recipes at the same time, and I have a covered glass raising with dough and another mixing a sponge cake. Consequently, a second blade is necessary and if it is with the silicone tongue, better. For me, this is a good investment.
As for the crystal glass, I have mixed opinions. On the one hand I love it. I find it beautiful, it is very lucid, funny and almost hypnotic to see the ingredients inside the glass. On the other hand, it weighs a lot. I am not able to hold it by the handle with one hand or when it is empty, but on the other hand I am a “lazy”.
I hope that after reading these simple instructions, you have a better understanding of how your KitchenAid stand mixer works and are encouraged to adapt many recipes.
In the next post I will talk about the procedures and speeds to use to make sponge dough, yeast dough, whip egg whites, whip cream, etc.