Installing a stainless steel fireplace liner is relatively easy, especially if you don’t mind crawling into tight spots. To install your fireplace surround at home, this is what you need to do:
Step 1 — Prepare the chimney liner for installation
To prepare the stainless steel fireplace liner for installation, remove the liner from its packaging and lay it on a flat surface. Hold the bottom connector of the appliance and then attach and tighten the hose clamp to the liner. Make sure the hose clamp is tight enough to hold the liner together.
Step 2: measure and cut the siding to fit the fireplace
Using a tape measure, measure the exact length of liner needed for your fireplace. Add 1 foot to the length needed to cover your fireplace from the bottom to the crown. After you measure the liner, get a couple of heavy duty tin scraps and carefully cut the liner. For safety reasons, make sure you don’t leave ragged edges on your siding.
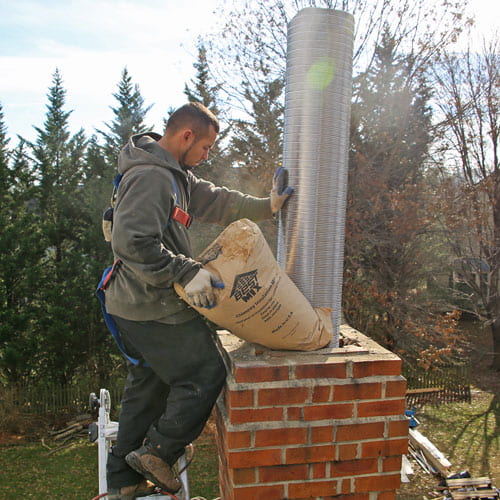
Step 3 — Insulate the cladding
The chimney liner must be insulated from top to bottom. To do this, get the insulating wrap and measure the amount needed to cover your siding and then add a 1-inch allowance for the overlap. After you cut your insulation wrap to fit your siding, you need to lay the insulation wrap on the ground with the aluminum side facing the ground. Place the siding in the center of the insulation, and then wrap the insulation around the siding. Leaving at least 1 inch of overlap at the seam and then secure the overlap with the use of masking tape. To secure the insulating wrap, spray adhesive on the liner and then use your hand to stroke the insulating wrap in place.
Step 4 — Protect the Insulation Wrap from Damage
To protect the insulation wrap from damage when installing the fireplace liner, encapsulate the entire length in the liner using a stainless steel mess. To do this, place the insulated fireplace liner in the center of the stainless steel clutter and then wrap the clutter around the liner. Use the hose clamps to keep the stainless steel mess in place. Be careful not to damage the insulation wrap while tightening the hose clamps.
Step 5 — Installing the siding
You may need a partner to help you install your fireplace liner, so make sure you have the necessary labor ready before you begin installing your liner. To install the liner, tie the rope around the liner, ask your partner to pull the rope from the top of the chimney while guiding the liner up the chimney. Once the chimney liner is in place, place silicone caulk around the chimney crown, then press the top of the liner inward. Secure the bottom of the liner and then attach the bottom of the liner to the connector on the appliance.
How to install a terracotta fireplace liner
Fireplace inserts are essential to the integrity and safety of masonry fireplaces. Older homes, built before code enforcement, often have lined fireplaces constructed of brick and mortar. Mortar deteriorates over time, allowing heat transfer to combustible materials. Terracotta siding can be installed to correct this problem. “A round tube fitting is the most efficient, but rectangular chimneys fit the best in brick construction,” explains Kenneth Nolan, author of Masonry and Concrete Construction. Experienced installers should perform the installation of a terracotta fireplace liner.
Instructions
Measure the qinside of the existing fireplace for the length and width of the fireplace walls. Accurate measurement is essential to selecting the proper size terra cotta fireplace tile.
• Purchase tube tiles. “Inspect clay fireplace tiles before you buy,” indicates Mark McCain. “All the tiles that you select must have identical interior dimensions and must be free of deformations and cracks,” he recommends.
• Place the first tile in the tile aligner tool and the top edge of the tile with butter fire cement. Lower the tab instead. Make sure the tile is centrally located, with even air gaps around it.
• Butter the top edge of the second tile and lower it into place precisely with the first tile.
• Remove the excess cement from the joint between the tiles with the most common tool. A loop wire tied to a long pole works well for this purpose.
• Continue to tile, align and smooth joints until the tiles extend out of the chimney, per your building area codes.
Tips and Warnings
- When fitting a fireplace stove, cut a clean-out hole in the bottom of the fireplace and cut another hole for the thimble where the pipe will be attached. Cut matching holes in terra cotta tiles and install in proper location. After the chimney liner is finished, mortar a door into the cleanout hole. The mortar thimble in place.
- Prevent cracking of terracotta fireplace inserts by installing tiles centrally within the fireplace walls, leaving space between the tiles and the existing fireplace. Fireplace inserts will expand when heated.